


Turn Your Photos Into Creative Wall Art

Design tips for your individual wall photo
Layout
Tips
Create your personalised wall art as a photo collage with your favourite pictures. You can design a custom layout for your wall art and add beautiful clipart.
Give your photo wall art an extra special touch with personal text overlays. Explore our pre-designed templates as inspiration for your creation.
Design tips for your individual wall photo
Layout
Tips
Here’s how it works:
Choose an ordering method and a wall art material.
Upload your favourite photos and explore our wide range of design options. Use designs, clipart, and personalised text to make your wall art a unique decoration.
Review the preview, complete your order, and look forward to your very own personalised photo as wall art.
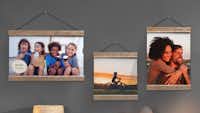
Photo Poster With Poster Hanger
Oak
Black
White
Made from FSC®-certified wood
Incl. metal chain and magnetic closure
Sizes: 22 cm, 31 cm, 41 cm, 51 cm
Available in landscape, portrait & square
from £12.98

Photo Poster With Poster Hanger
Oak
Black
White
Made from FSC®-certified wood
Incl. metal chain and magnetic closure
Sizes: 22 cm, 31 cm, 41 cm, 51 cm
Available in landscape, portrait & square
from £12.98
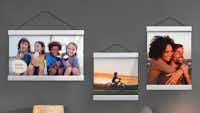
Photo Poster With Poster Hanger
Oak
Black
White
Made from FSC®-certified wood
Incl. metal chain and magnetic closure
Sizes: 22 cm, 31 cm, 41 cm, 51 cm
Available in landscape, portrait & square
from £12.98


“Wonderful quality and service”
“Brilliant quality and speedy delivery. I really love Pixum because it?s so easy to use.”
“Excellent quality print. Good packaging. Not cheap, but good!”
“It's beautiful and clear! Easy to hang up! the web site is very clear and easy to work with! And nice costumer service! thanks for the great experience”
“Excellent quality. Print looks exactly how it did on my laptop. Order arrived three days before I was expecting it. Will definately be using Pixum again.”